As I said in my previous post, my husband @mrwideen and I have figured out a way to send assignments, worksheets and activities to my grade 1 and 2 students using the iPads without having to sign my students up for email addresses or by using an exterior community website like Edmodo. The following is a step by step tutorial of how we set up my classroom:
1. Sign up for a classroom
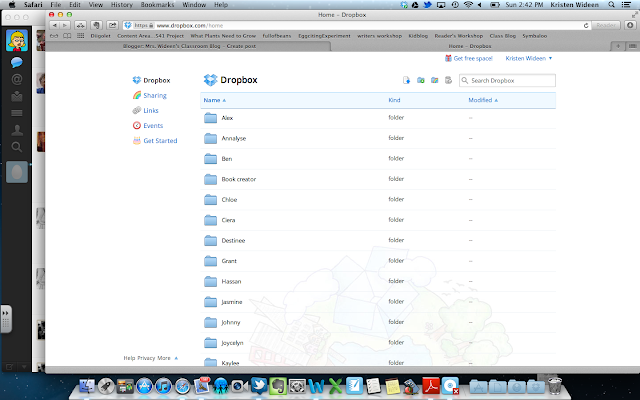
Dropbox account. After signing up for Dropbox, create a folder for each one of your students. Download the Dropbox app onto each student iPad. Log onto the classroom account on each student iPad.
 |
| Screen shot of dropbox with my students' files. |
2.
Download the iPad app Remarks on all of your student iPads. Remarks is a PDF annotating application. The app allows users to highlight, underline, strikeout and draw upon documents. This means your students can write on any PDF that you send them via Dropbox.
3. Open Remarks app, click on network on the bottom of the screen.
4. After clicking on Network, add your Dropbox account.
5. Once you have added your dropbox account to the Remarks app, click on your Dropbox account that was just created. For example, I've used my first and last name for my account.
6. After clicking on your Dropbox account, all of your student folders that you created will pop up.
7. To place assignments into your students' folders, you need to save the assignment as a PDF. Save a copy of the PDF in each of the students' folders in Dropbox. For example, I have clicked on the Mrs. Wideen folder. As you can see the PDF (Jitter Juice Poem) was saved in the folder.
8. Click on the PDF/assignment. The note will download and appear on your screen as shown.
9. Students can use their finger, stylist or use the built in iPad keyboard to annotate.
10. When students complete their assignment, have students first click on the share icon. A box will appear with different choices. Have your students choose the "Upload Note" option.
11. Have your students' choose the classroom Dropbox account.
12. After choosing the classroom Dropbox account, have students choose their own name.
13. Click upload.
14. Click replace, so the finished assignment is replacing the original document in the folder.
15. You are done! The completed work is in each of your students' folders for you to assess. You also have a ready made portfolio for you, documenting all of your students' work!
If you are thinking that it would take too long to save the original PDF in each child's folder (#7). I do have a solution for that, if you use a Mac computer. However, you will have to wait for my next blog post to find out.


